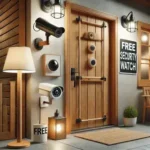
Installing an outdoor security camera is one of the best and most efficient ways to defend your house. It gives you peace of mind knowing that your property is being watched, in addition to discouraging potential burglars. Attaching your camera to a downspout can be a great option if you’re looking for a clever and practical way to install it. All the knowledge you require to successfully install an outdoor security camera on your downspout is contained in this guide.
Why Choose a Downspout for Your Camera Mounting?
Attaching your security camera to a downspout can provide numerous advantages. Let’s take a closer look:
- OptimaIdeal Exposure
- You may watch more of your surroundings by mounting a camera higher up on the downspout, which provides a wider field of vision.
- Appropriate Positioning
- A downspout is a less obvious place for a security camera because it is frequently out of sight. This keeps your camera hidden and discourages would-be thieves from tampering with it.
- Defence Against the Weather
- Usually found beneath your roof’s eaves, downspouts can shield your camera from inclement weather like rain, snow, and bright sunshine. Your camera’s lifespan may be increased with this additional protection.
- Secure Installation
- You may benefit from a sturdy and solid structure that can sustain the weight of your camera by mounting it to a downspout.
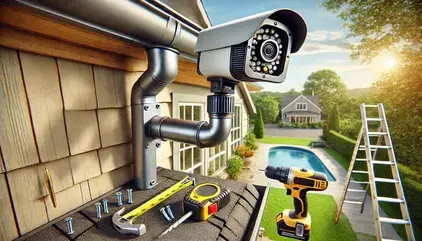
Materials You’ll Need for Mounting the Camera
Before you start, gather the materials and tools you’ll need for the installation:
- Outdoor Security Camera: Verify that the camera is made especially for outdoor applications. Seek out weatherproof cameras that can detect motion, see in the dark, and record in high resolution.
- A mounting bracket is a bracket made specifically for gutters or downspouts. It ought to be strong and able to hold the camera.
- Screws and Anchors: To firmly fasten the mounting bracket, you’ll need screws and anchors that work with the downspout material (metal, PVC, etc.).
- Drill and Bits: Select a drill and bit that are the same size as the anchors and screws you plan to use.
- Level: To guarantee that the camera is positioned correctly and offers precise coverage.
- Measuring tape: For accurate measurement guarantee the right camera position.
Step-by-Step Instructions for Installing an Outdoor Security Camera on a Downspout
Step 1: Plan Your Camera’s Position
Before you begin drilling, you’ll want to assess where you want to place the camera. Here’s how:
- Assess the Field of View: Go on a stroll around your property and note any places you would like to keep an eye on, including doorways, driveways, or blind spots. Make sure the camera captures important entry points by taking into account its angle.
- Select the Proper Height: It’s best to mount your camera between 8 and 12 feet above the ground. A wide perspective and straightforward tampering prevention are well-balanced at this height.
- Make Sure You Have Electricity Access: If your camera needs electricity, make sure it’s near a power outlet. If not, think about using solar-powered cameras, which do not require cables.
Step 2: Prepare the Downspout for Mounting
Once you’ve determined where the camera will be placed, follow these preparation steps:
- Clean the downspout: To ensure a secure attachment, make sure the area surrounding the downspout is free of dirt and debris.
- Verify Stability: Make sure the downspout is securely fastened to the wall. Your camera will have the best support from a steady downspout.
Step 3: Install the Mounting Bracket
Now it’s time to install the mounting bracket that will hold your camera. Follow these steps carefully:
- Mark Drill Points: Place the mounting bracket where you wish to place it up against the downspout. Mark the location of the screws with a pencil.
- Drill Pilot Holes: Make sure your drill bit size is appropriate for the screws and anchors you plan to use. Mark the locations with tiny pilot holes.
- Mounting Bracket Attachment: Place the bracket over the holes and fasten it with anchors and screws. Make sure the bracket is securely fastened by tightening the screws using a screwdriver.
Step 4: Mount the Camera
Now it’s time to attach your outdoor security camera to the bracket:
- Connect the camera: Your camera can be screwed or slid onto the bracket. Verify that it is securely fastened.
- Modify the Angle: The mounts on the majority of cameras are movable. Adjust the camera’s angle so that it captures the region you wish to watch. To make sure the camera is precisely straight, use a level.
- Verify Cable Connections: If your camera is wired, ensure sure all of the wires are firmly attached to it and correctly routed. To anchor the cables along the downspout, use cable ties or clips.
Step 5: Power Up and Test the Camera
Before you call it done, you’ll need to power up and test your camera:
- Power the Camera: Connect the camera to the power source to supply power. Make sure your solar-powered camera receives enough sunshine if you’re using one.
- Test the View: Examine the live feed from the camera and, if required, change the angle to capture the appropriate region. Verify that the camera is operating properly and that the video quality satisfies your requirements.
Best Practices for Maintaining Your Outdoor Security Camera
- Frequent Cleaning: The camera’s lens may become obstructed by dust, grime, and moisture. To guarantee clear video, clean the lens and housing on a regular basis.
- Verify Camera Alignment: The camera may move a little bit over time. Periodically check its alignment and make any required readjustments.
- Monitor Camera Performance: Verify that the camera is operational and linked to your app or security system. To make sure the live feed is uninterruptedly recording video, test it frequently.
- Weatherproof Your Setup: Make sure the connections and wiring on your camera are sufficiently protected from the elements. If required, protect electrical connections with waterproof materials.
Troubleshooting Common Issues
- Bad Wi-Fi Signal: If your camera depends on Wi-Fi, you can have trouble getting a signal. For better connectivity, think about utilising a Wi-Fi extension.
- No Power: Verify your power supply and connections if the camera isn’t turning on. Make sure the cable is firmly attached to any wired cameras.
- Problems with Cloud Storage: Make sure your membership is active and that there is adequate room for new video if you have cloud storage enabled.
Conclusion
One excellent method to increase the protection of your house is to mount an exterior security camera on a downspout. You can position your camera in a way that is both efficient and discrete, while also shielding it from the elements, by following the instructions provided in this article. Remember to test the camera after installation, adjust it as needed, and do routine maintenance to make sure it functions properly. This method offers a clever, safe, and economical solution to safeguard your stuff.
FAQs
1. Can I mount any camera on a downspout?
The majority of outdoor security cameras may be installed on downspouts, but before doing so, make sure to check the mounting specifications. Certain cameras could require particular setups or mounting brackets.
2. How high should I mount the security camera?
It is best to mount the camera at least 8 to 12 feet above the ground. This height reduces the possibility of tampering and guarantees improved coverage.
3. How do I prevent the camera from being tampered with?
Install the camera using sturdy brackets in a less obvious location, such as a gutter. For extra security, think about utilising inclosures and screws that are difficult to tamper with.
4. Can I install a wired camera on a downspout?
Yes, It is possible to mount wired cameras on a downspout. Just make sure the cables are weatherproofed and securely fastened.
5. How do I troubleshoot a camera with poor video quality?
Look for debris or blockages on the lens. Verify the camera’s alignment and the stability of the internet connection, if any.